📅 Booking Action
The Booking Action allows your AI Agent to automatically schedule meetings, consultations, appointments, and service bookings with customers.
This action is useful for businesses that provide services and need customers to reserve a specific date and time.
Examples:
- AI setup consultations
- Dental appointments
- Beauty salon reservations
- HR consultations
- Legal consultations
- Coaching sessions
- Product demos
Ainisa can create bookings using:
- Google Calendar
- Calendly
📍 Creating a Booking Action
Navigate to:
AI Agents → Select AI Agent → AI Actions → Create Action → Booking
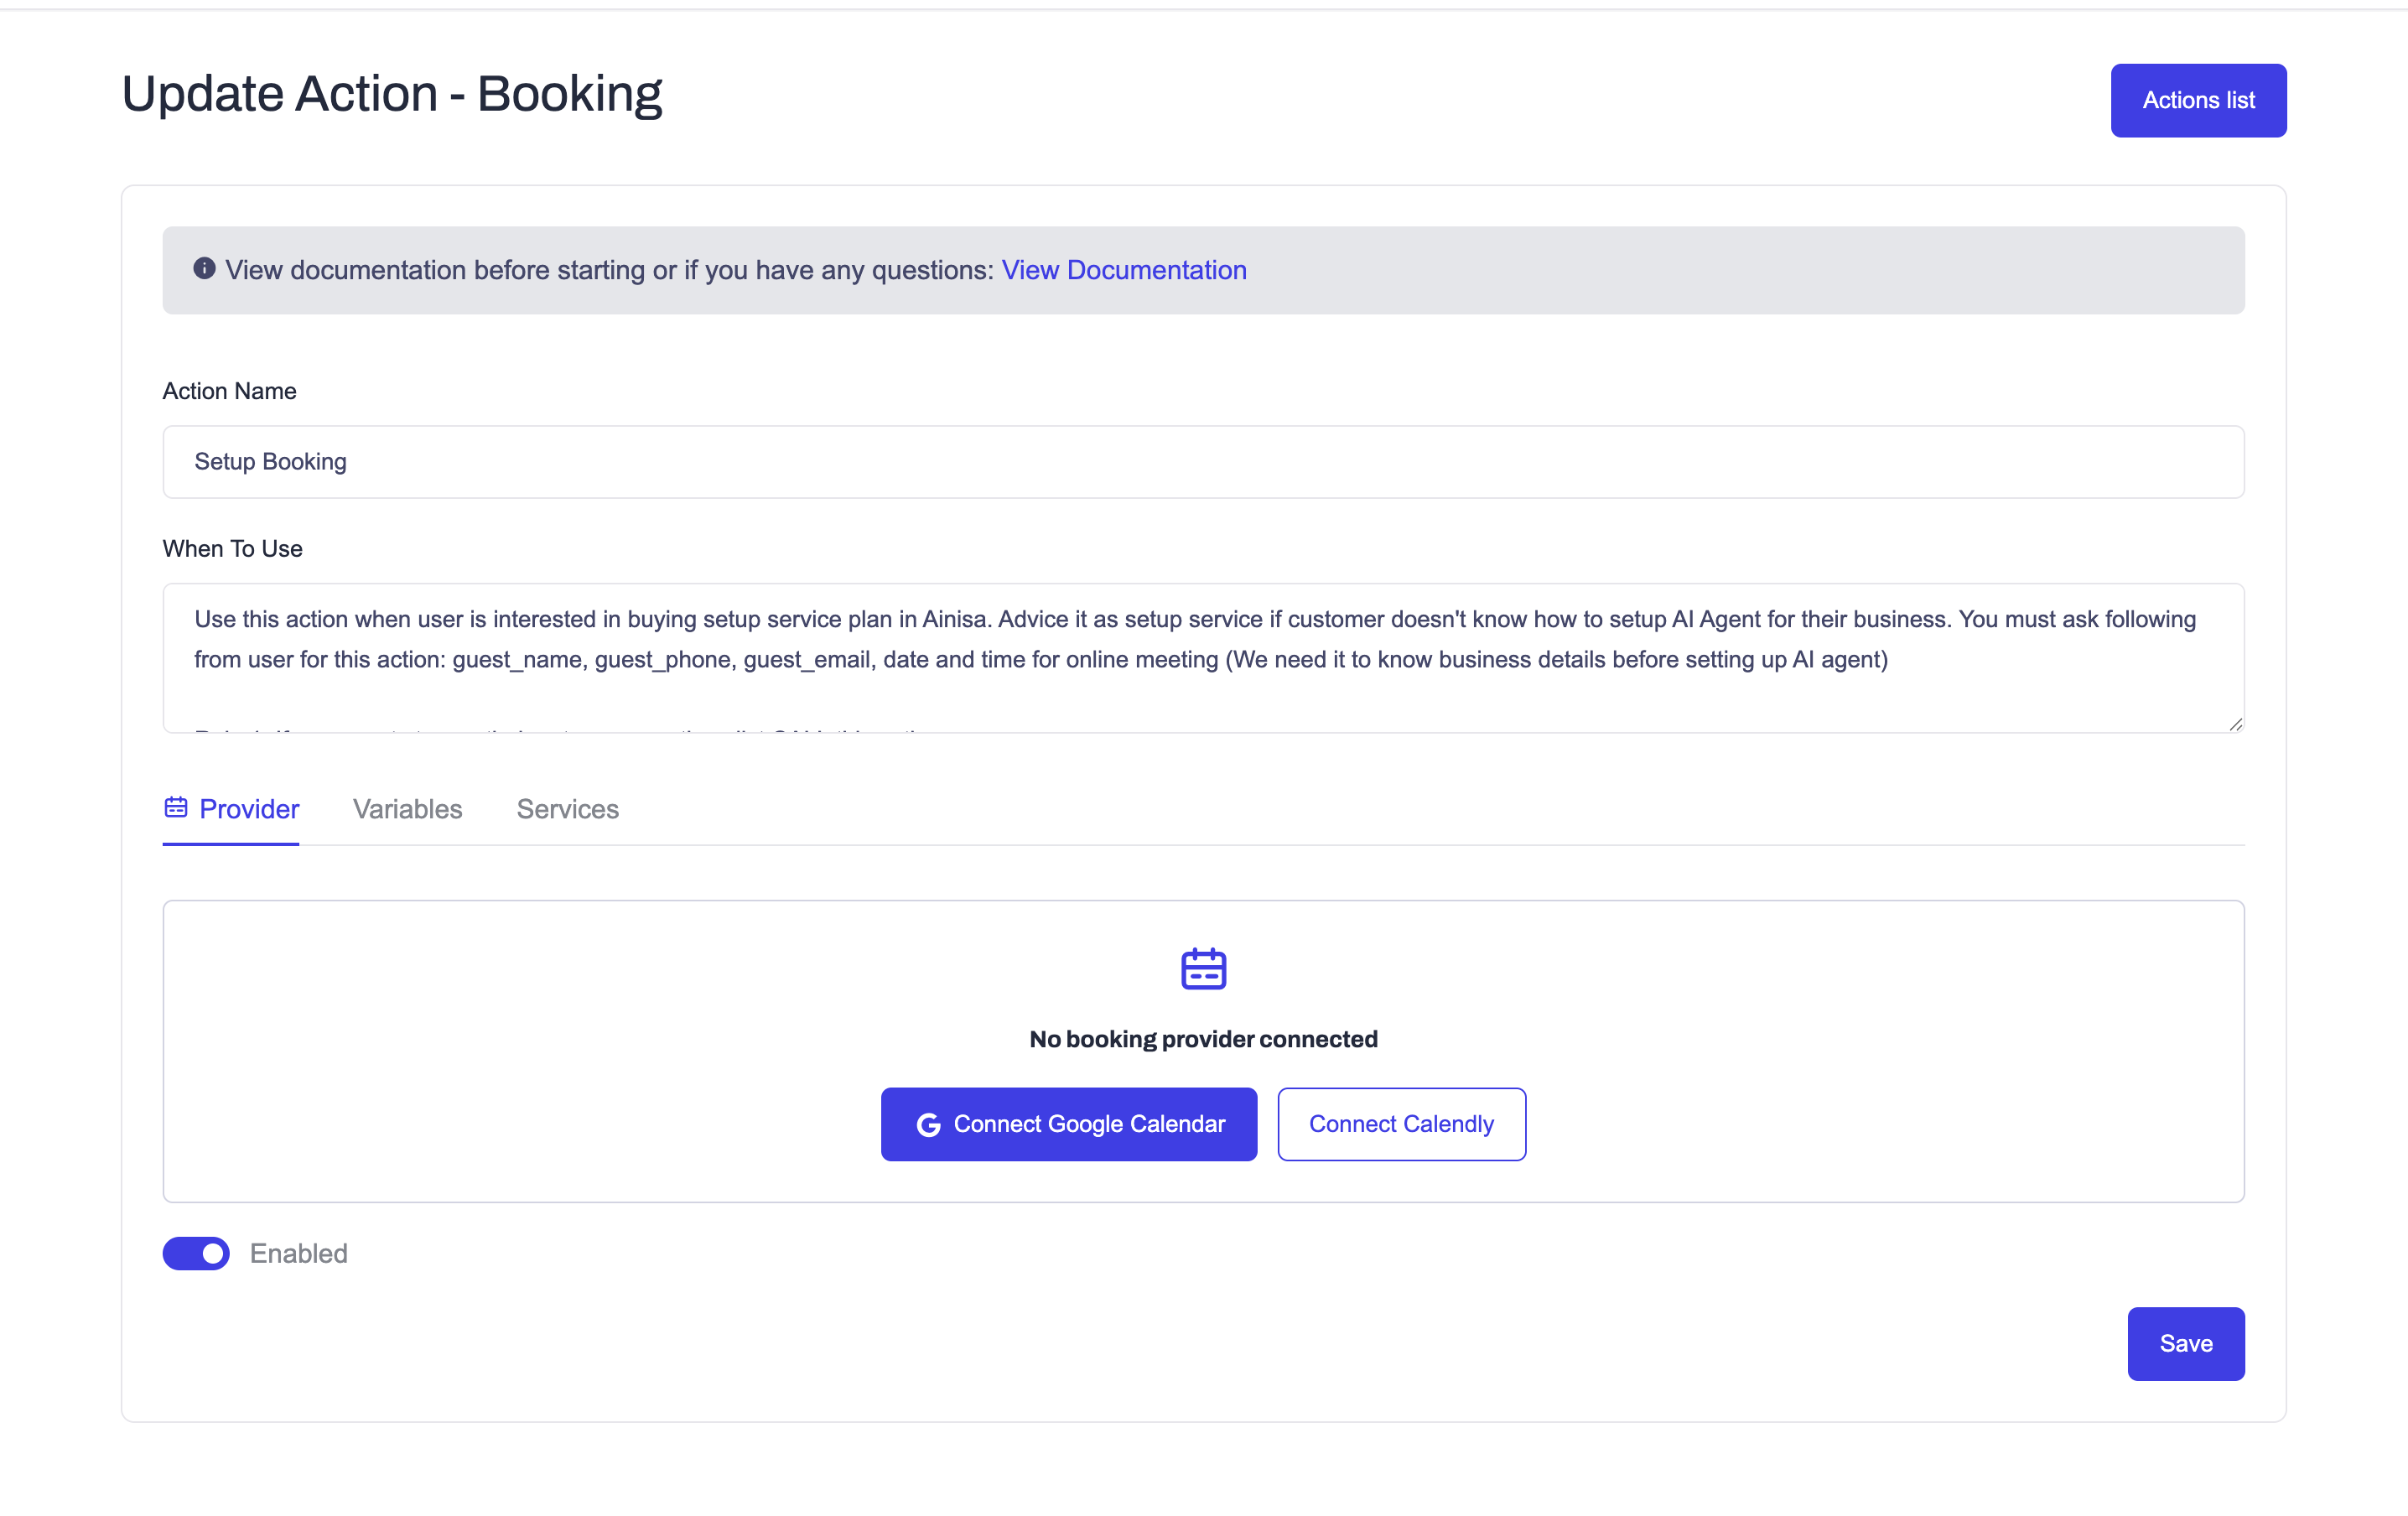
Step 1: Create the Action
Fill in the basic information:
| Field | Description |
|---|---|
| Action Name | Internal name of the booking action |
| When To Use | Instructions explaining when AI should use this booking action |
Example:
- Action Name:
Setup Service Booking - When To Use:
Use this action when a customer wants to purchase our setup service and schedule a meeting.
📅 Step 2: Connect a Booking Provider
Open the Provider tab.
Booking Actions require a booking provider where appointments will be created.
Supported providers:
- Google Calendar
- Calendly
Google Calendar
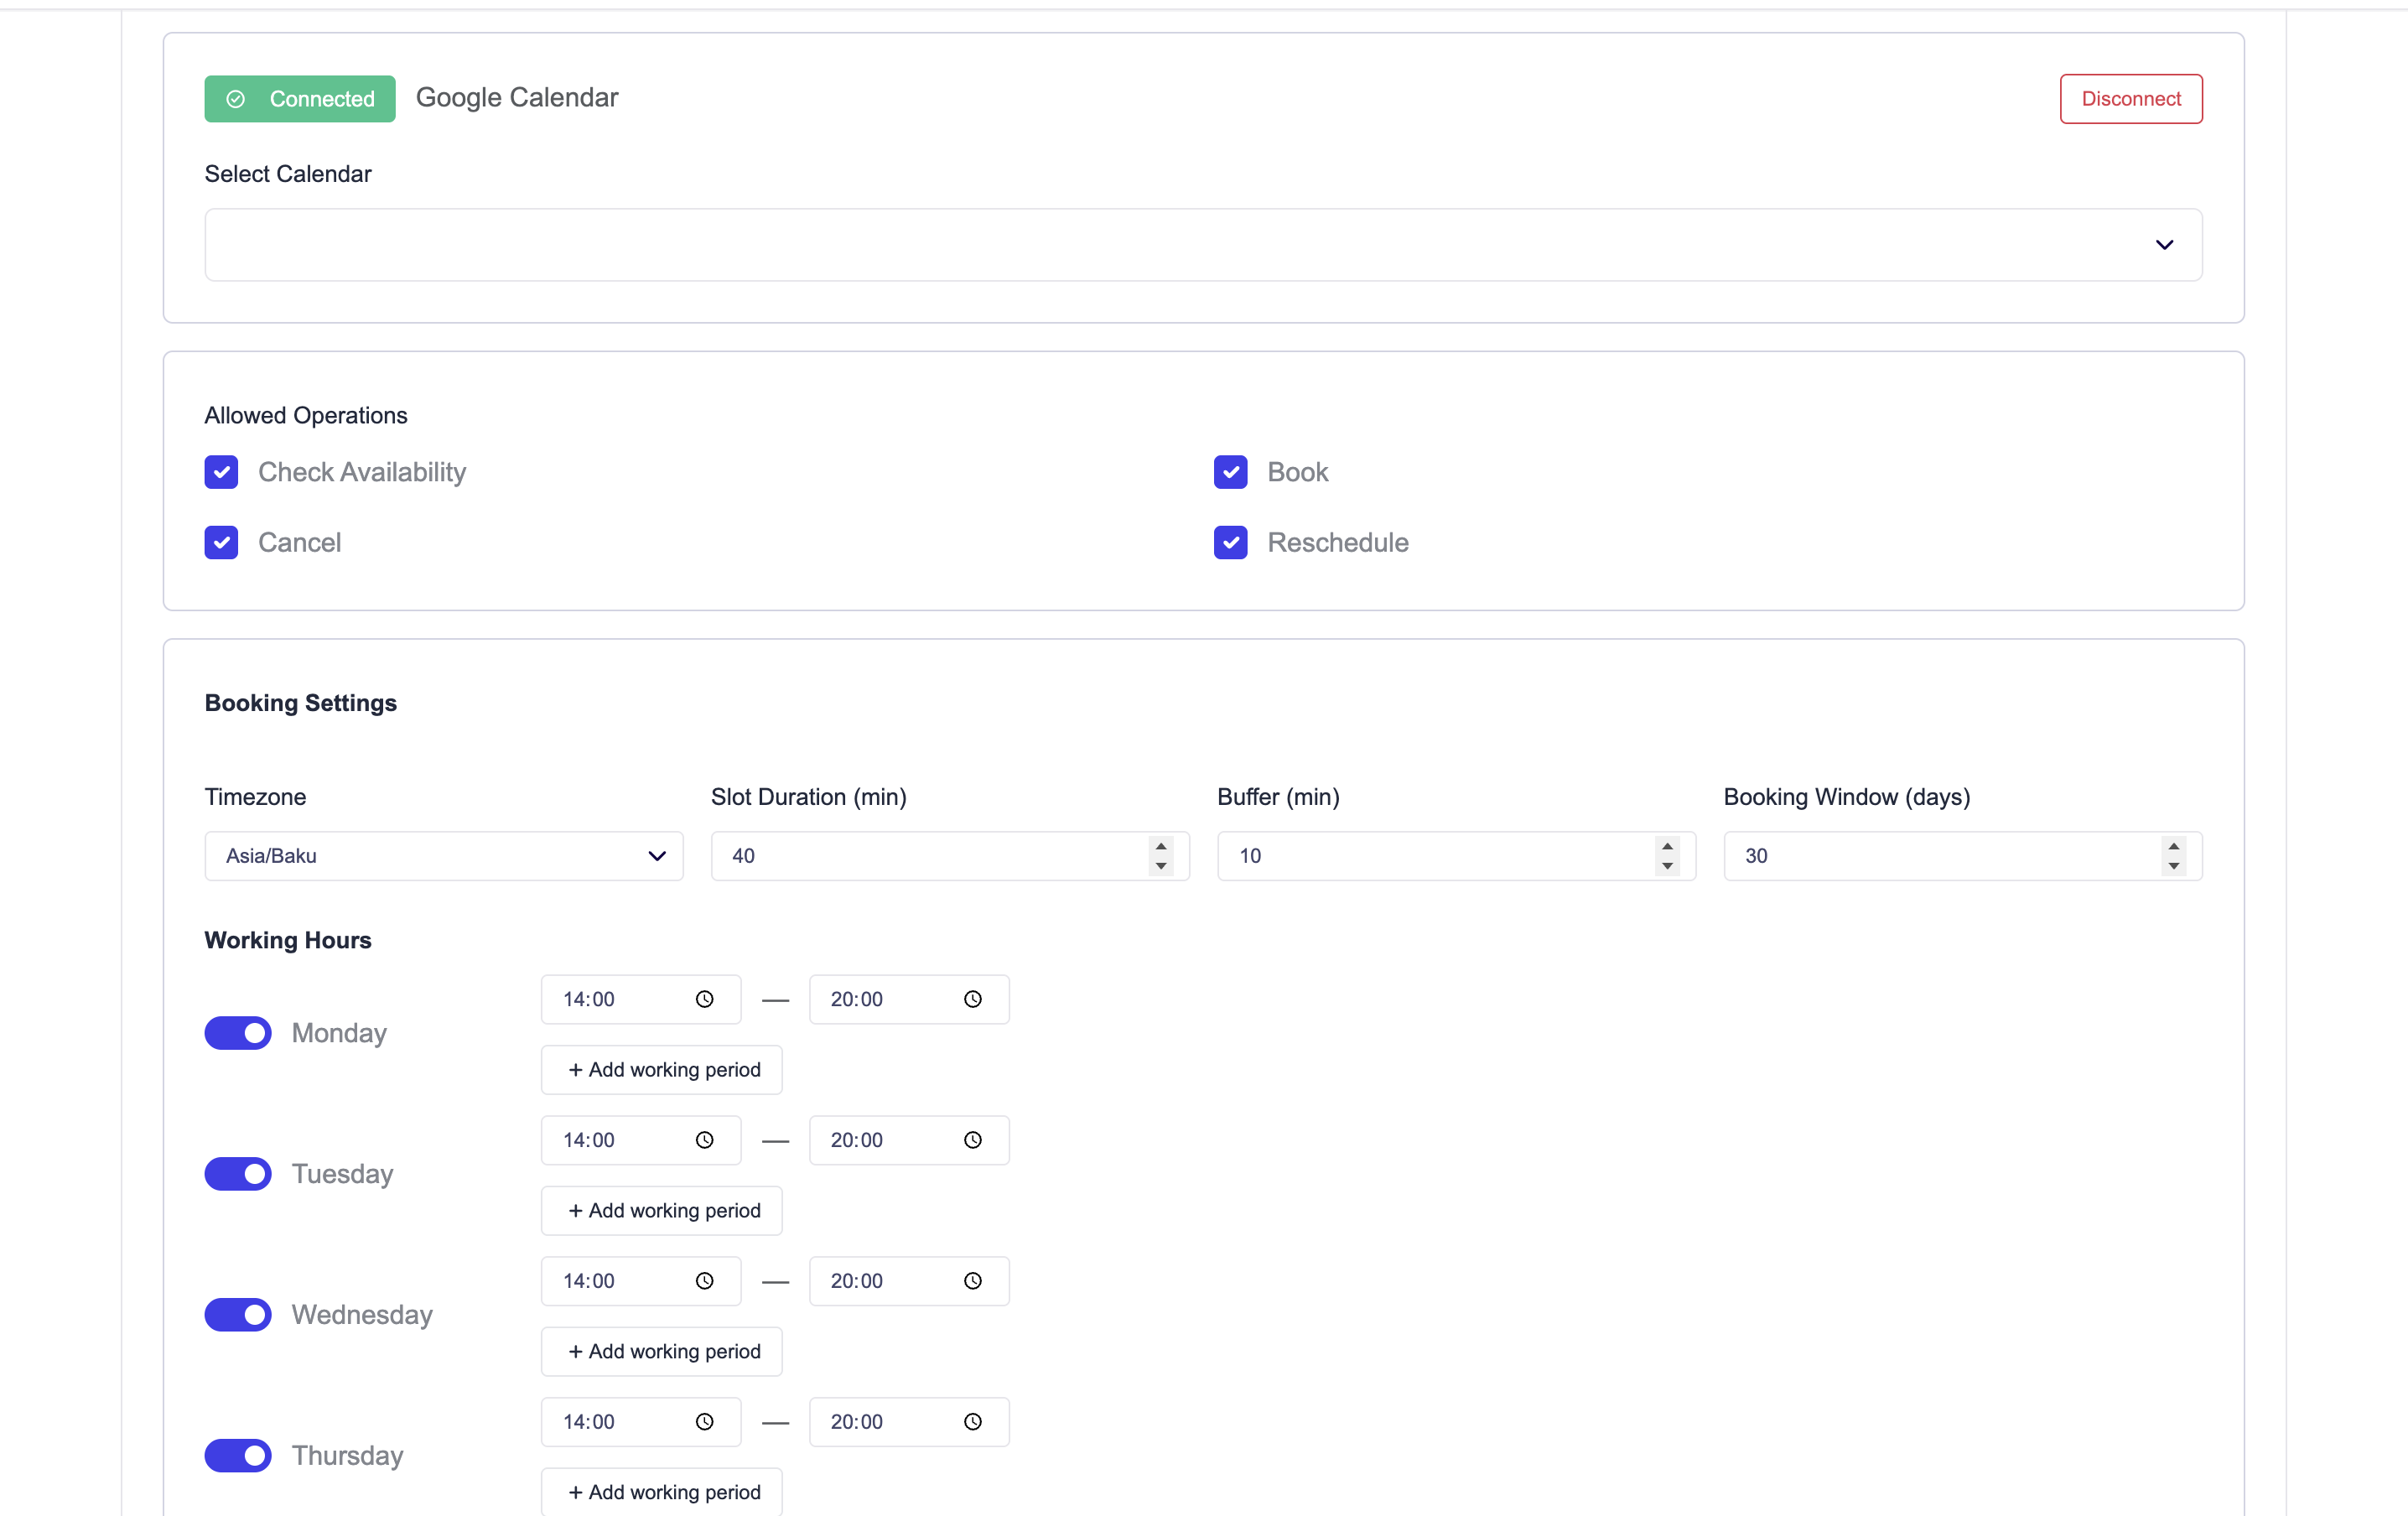
If you select Google Calendar:
- Click Connect Google Calendar
- Authorize your Google account
- Under Select Calendar, choose the calendar that should receive bookings
- Under Select Calendar (Event Type) for this action, choose the calendar/event type this specific action will use
- Configure booking settings
Allowed Operations
Choose which operations the AI is permitted to perform:
| Operation | Description |
|---|---|
| Check Availability | AI can look up free slots |
| Book | AI can create a booking |
| Cancel | AI can cancel an existing booking |
| Reschedule | AI can move a booking to a new time |
| Update Attendee E-mail | AI can update the attendee's email (Google Calendar only) |
We advise you to write a proper prompt in the When To Use field describing when, how, and which operation the AI should use for this action. This helps the AI better understand its role.
Booking Settings
After connecting Google Calendar you can configure:
| Setting | Description |
|---|---|
| Timezone | Your business timezone |
| Slot Duration (min) | Length of each appointment |
| Buffer (min) | Time between appointments |
| Booking Window (days) | How many days ahead customers can book |
| Working Hours | Available booking times for each day; you can toggle days on/off and add multiple working periods per day using + Add working period |
Calendly
If you select Calendly:
- Click Connect Calendly
- Authorize your Calendly account
- Select the event type you want Ainisa to use
Important: Calendly integrations require an active paid Calendly subscription.
🧩 Step 3: Configure Variables
Open the Variables tab.
Variables define what information the AI should collect from customers before creating a booking.
Variable field_id can have only English letters, numbers, dash, underscore
Booking System Fields
The following fields are always collected by the booking system:
| Field | Type | Description | Required |
|---|---|---|---|
| guest_name | string | Customer full name | Always required |
| guest_phone | string | Customer phone number | Always required |
| guest_email | string | Customer email address | Configurable (see below) |
About guest_email:
- If the provider is Google Calendar, you can toggle whether
guest_emailis required. If disabled, the AI will not ask the customer for an email during booking. - For all other providers (e.g. Calendly),
guest_emailis always required.
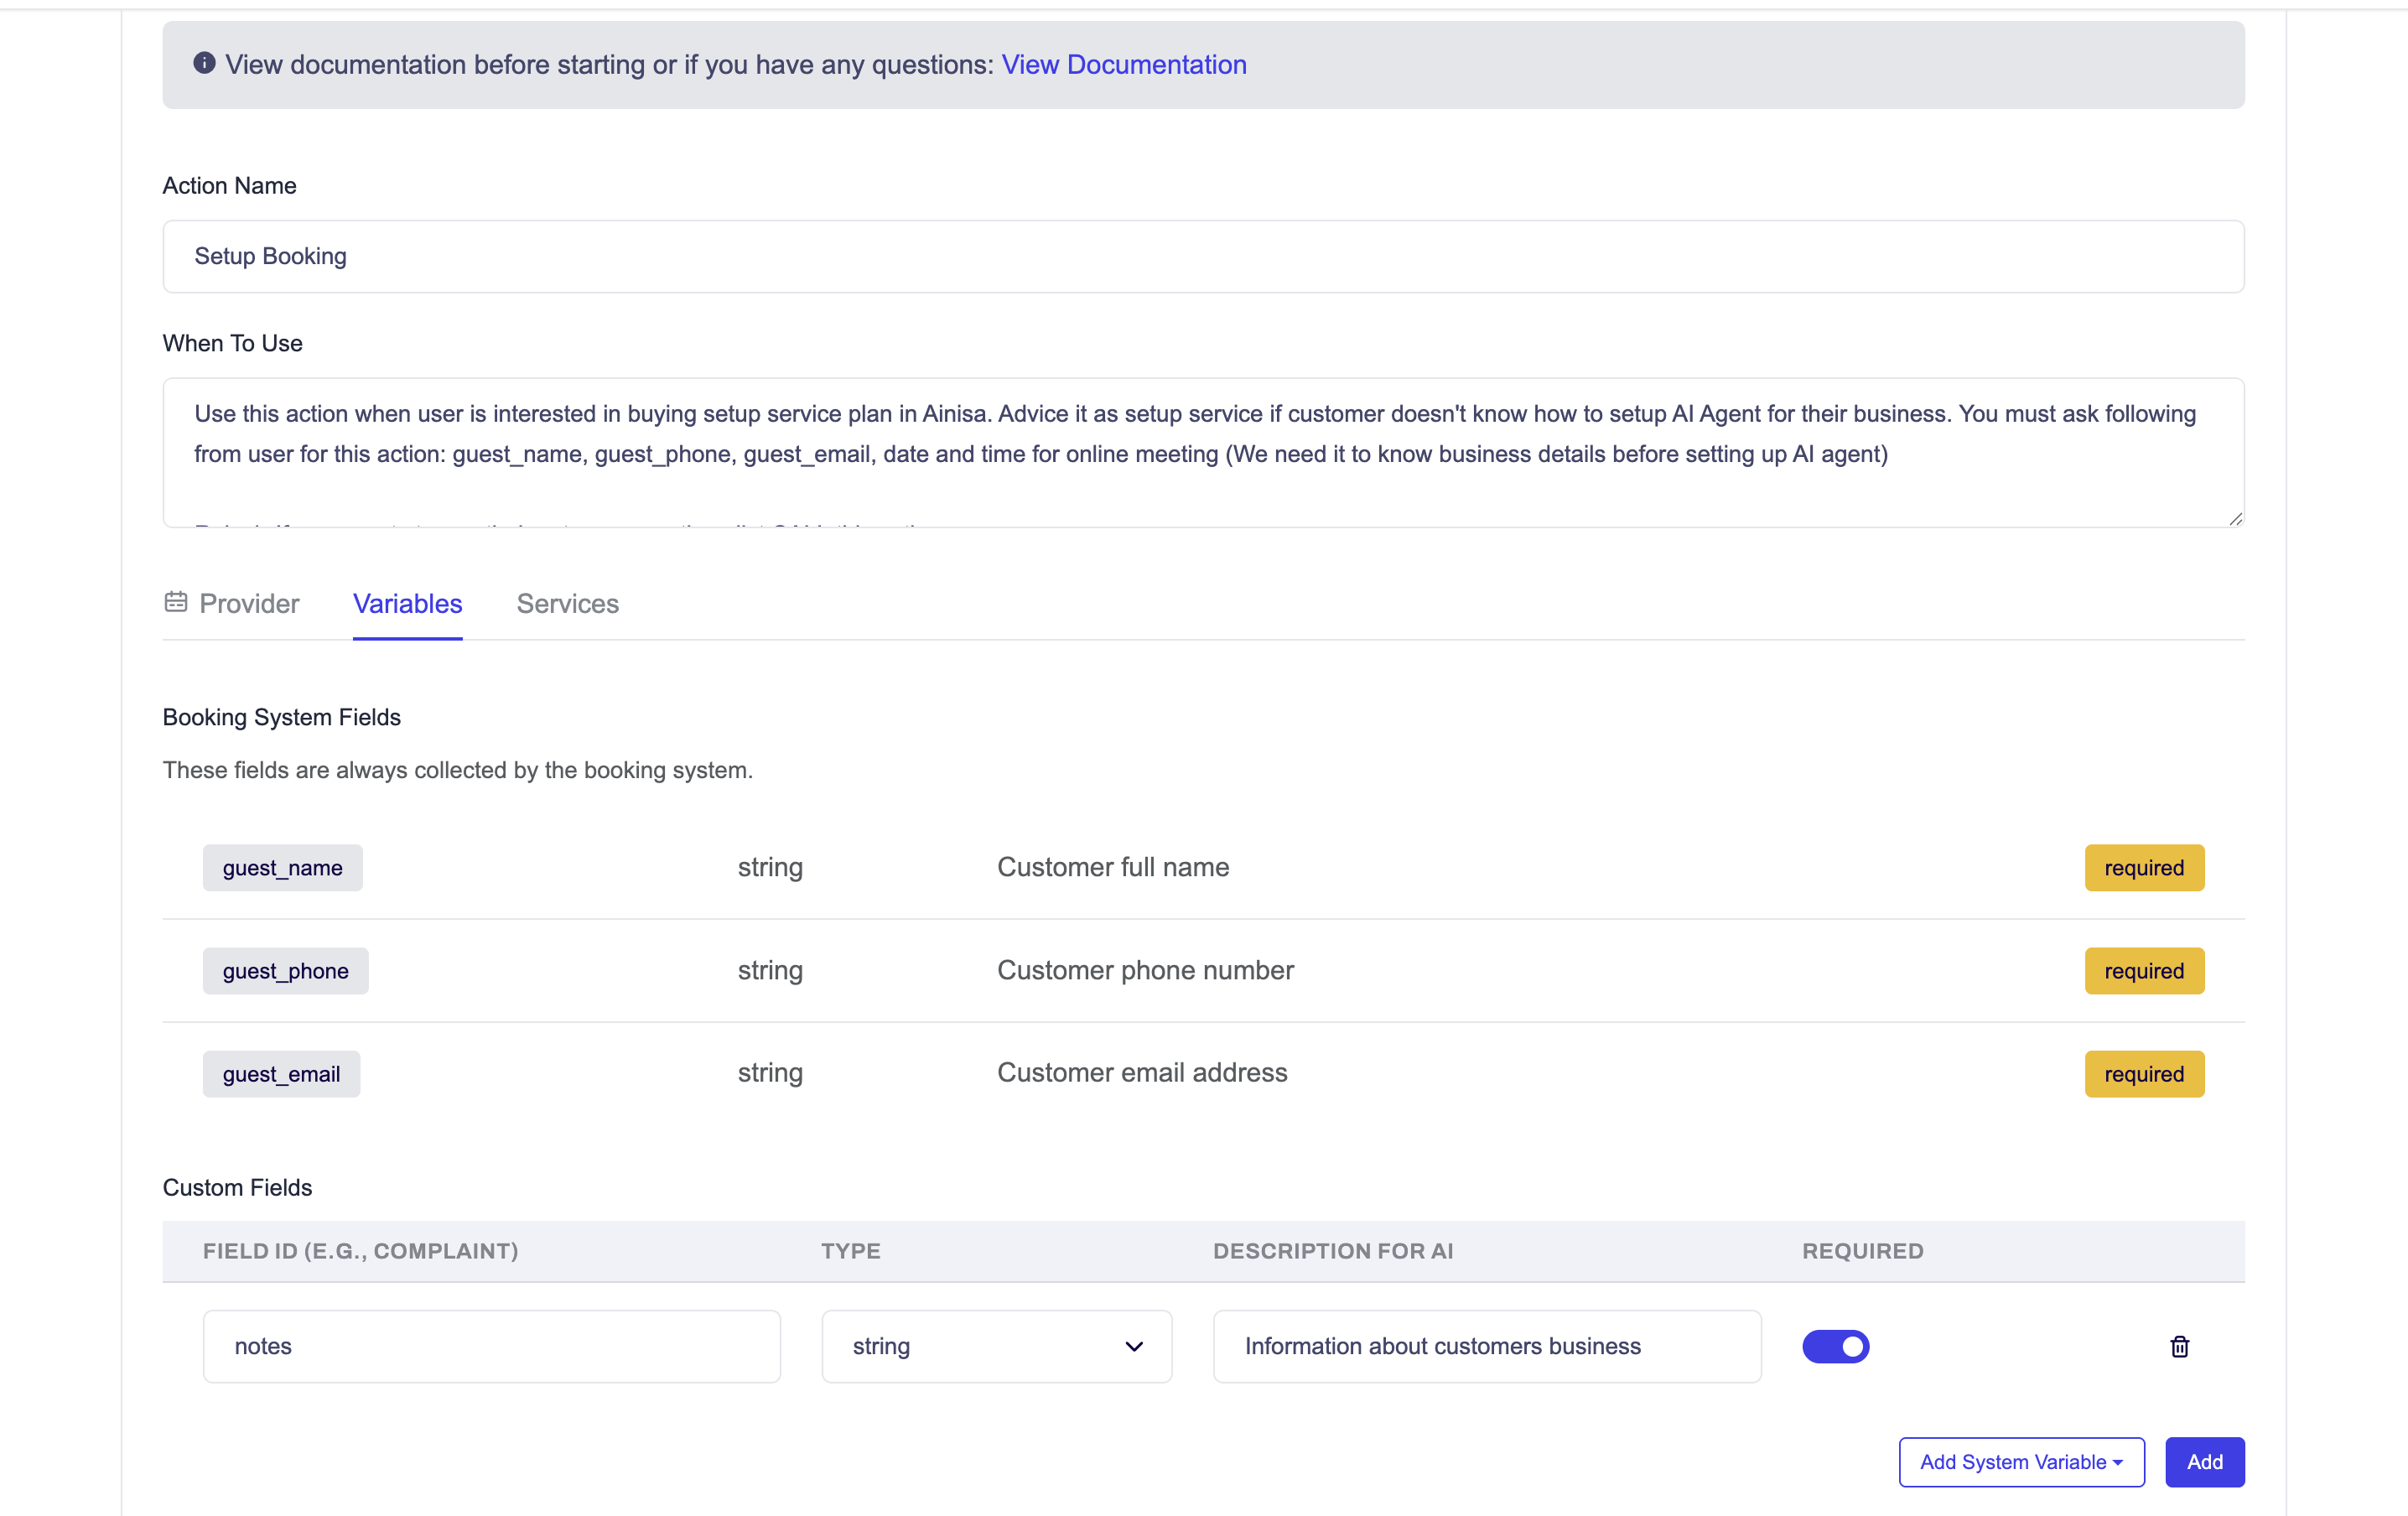
Custom Fields
You can also create additional variables that the AI should collect.
Each custom field has:
| Column | Description |
|---|---|
| Field ID (e.g., complaint) | Internal identifier for this value |
| Type | Data type of the value |
| Description for AI | Explains to the AI what this field means |
| Required | Whether the AI must collect it before booking |
Examples:
| Field ID | Description |
|---|---|
| notes | Additional information about customer needs |
| company_name | Customer company |
| service_details | Details about requested service |
| complaint | Customer complaint or issue |
| budget | Available budget |
Use the Add System Variable dropdown to insert built-in variables, or fill the row and click Add for a custom one.
The AI will automatically ask customers for required information before creating the booking.
🛠️ Step 4: Configure Services
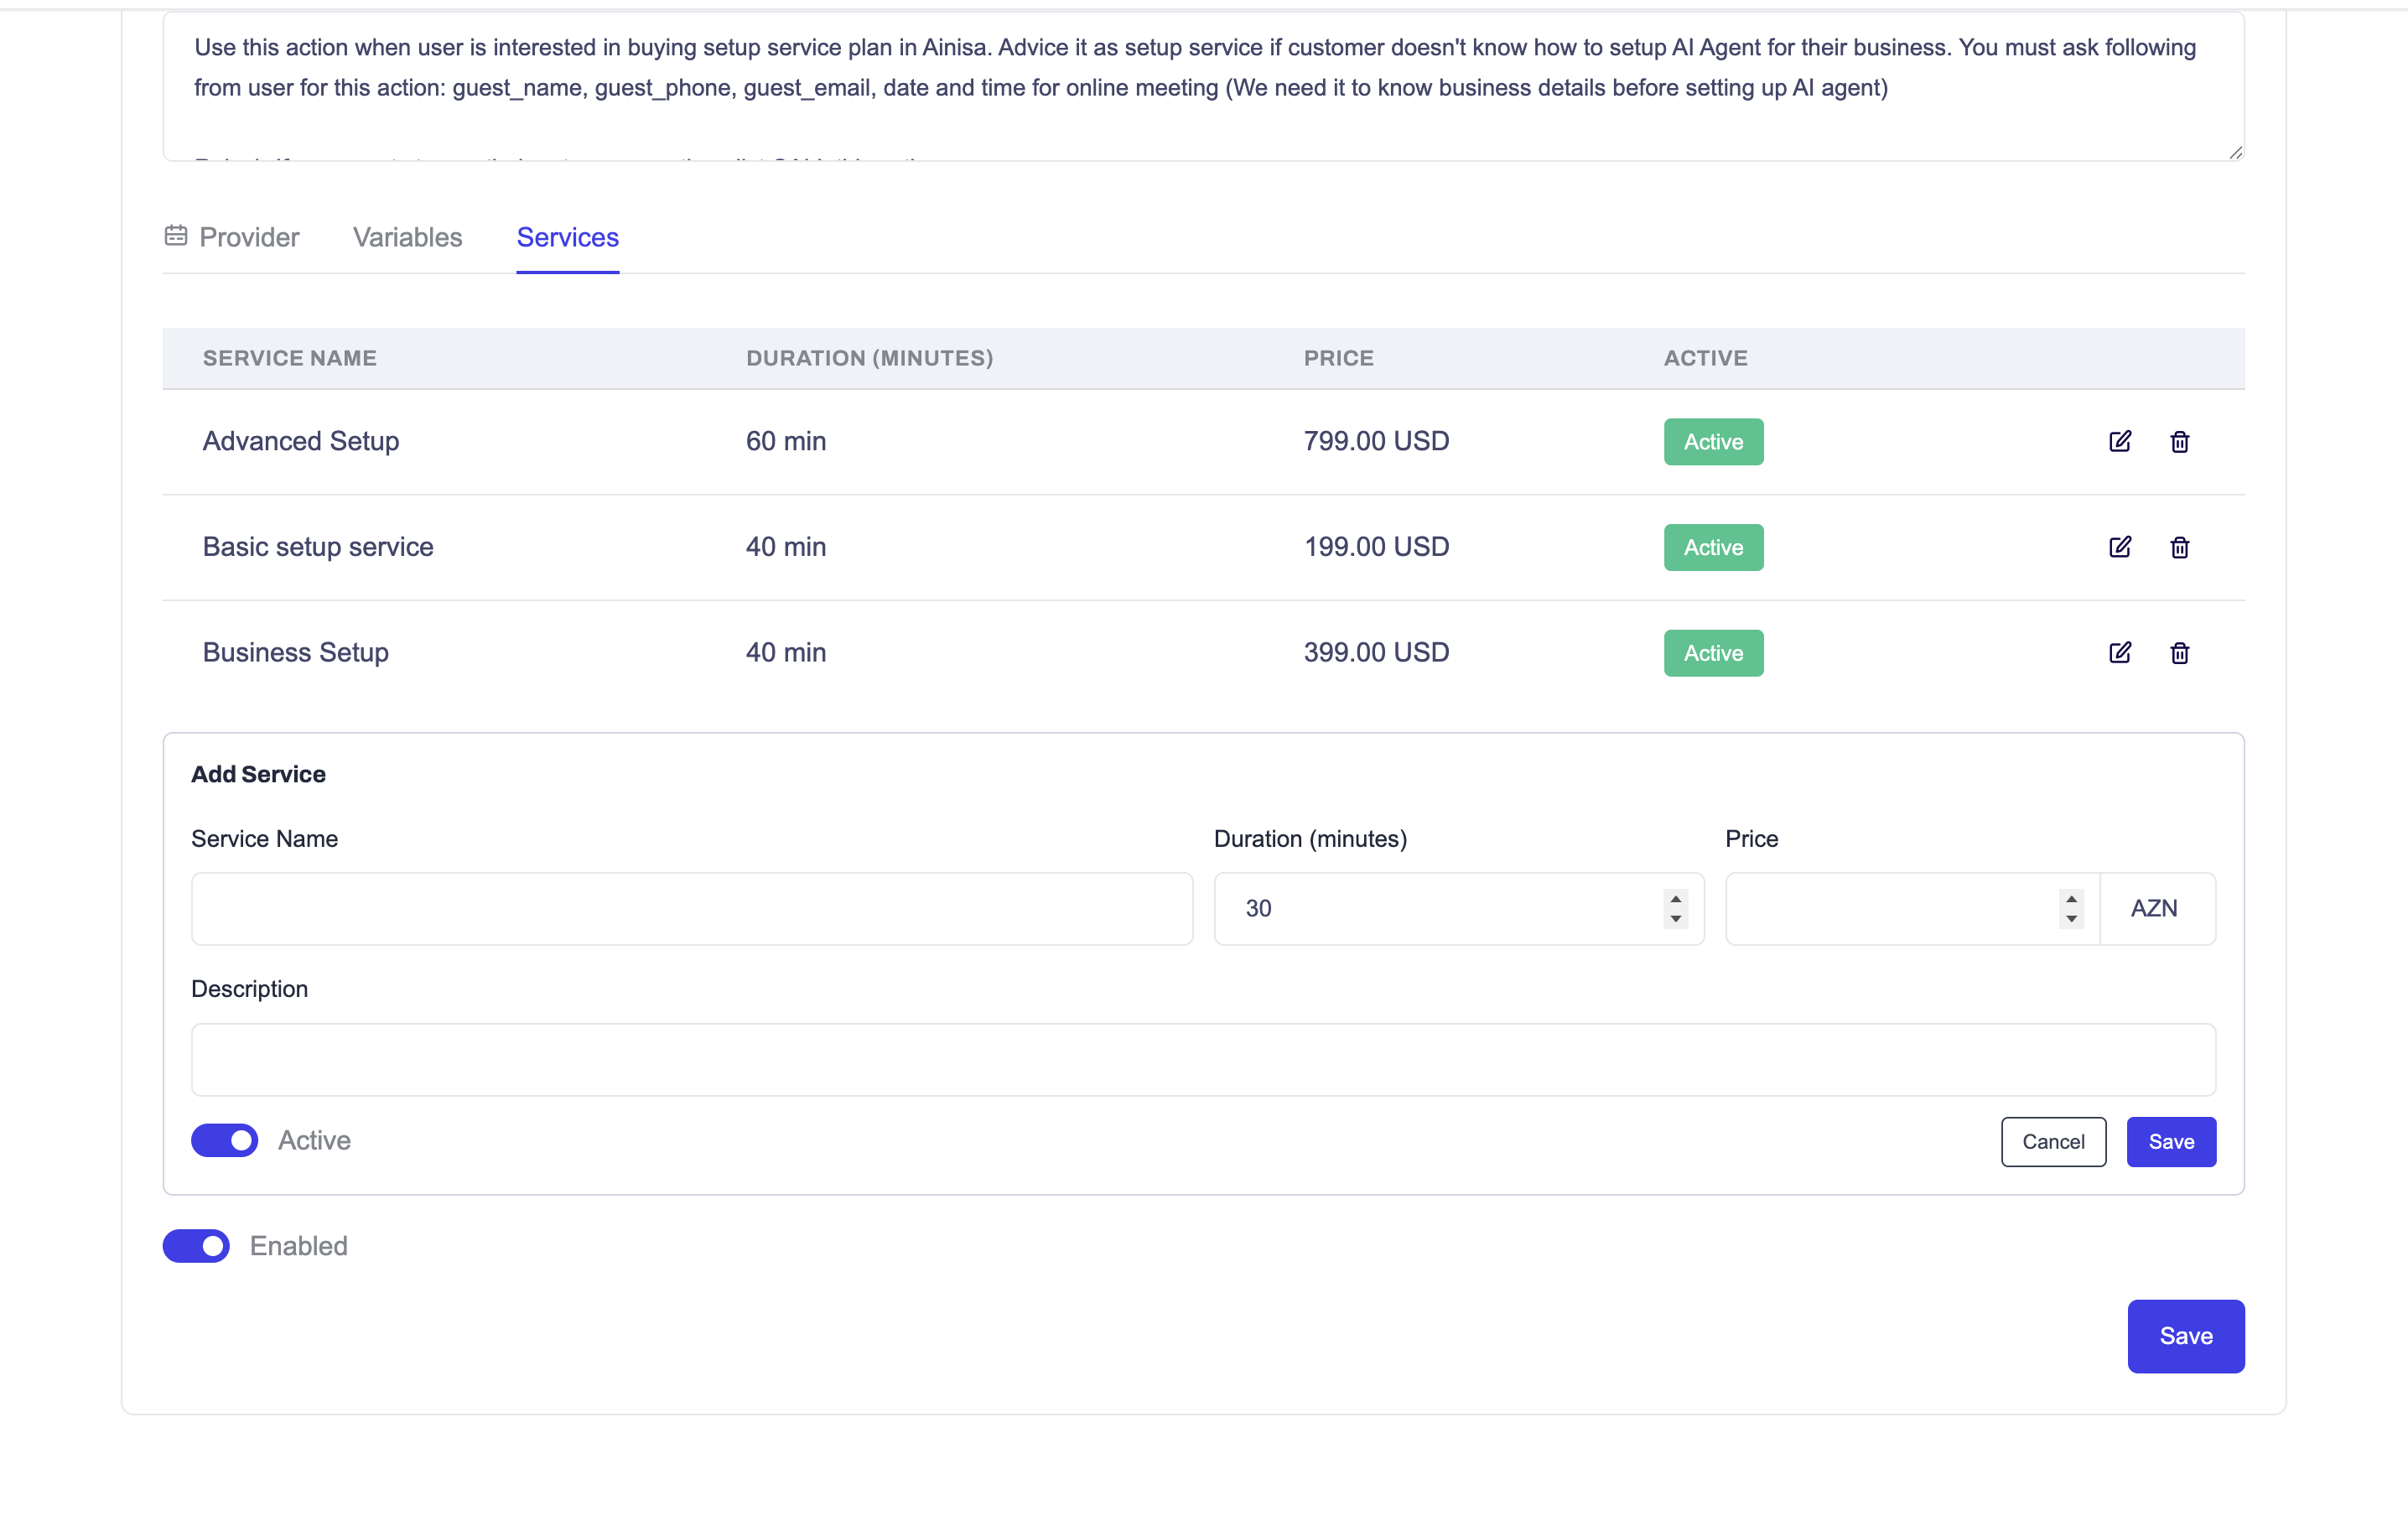
Open the Services tab.
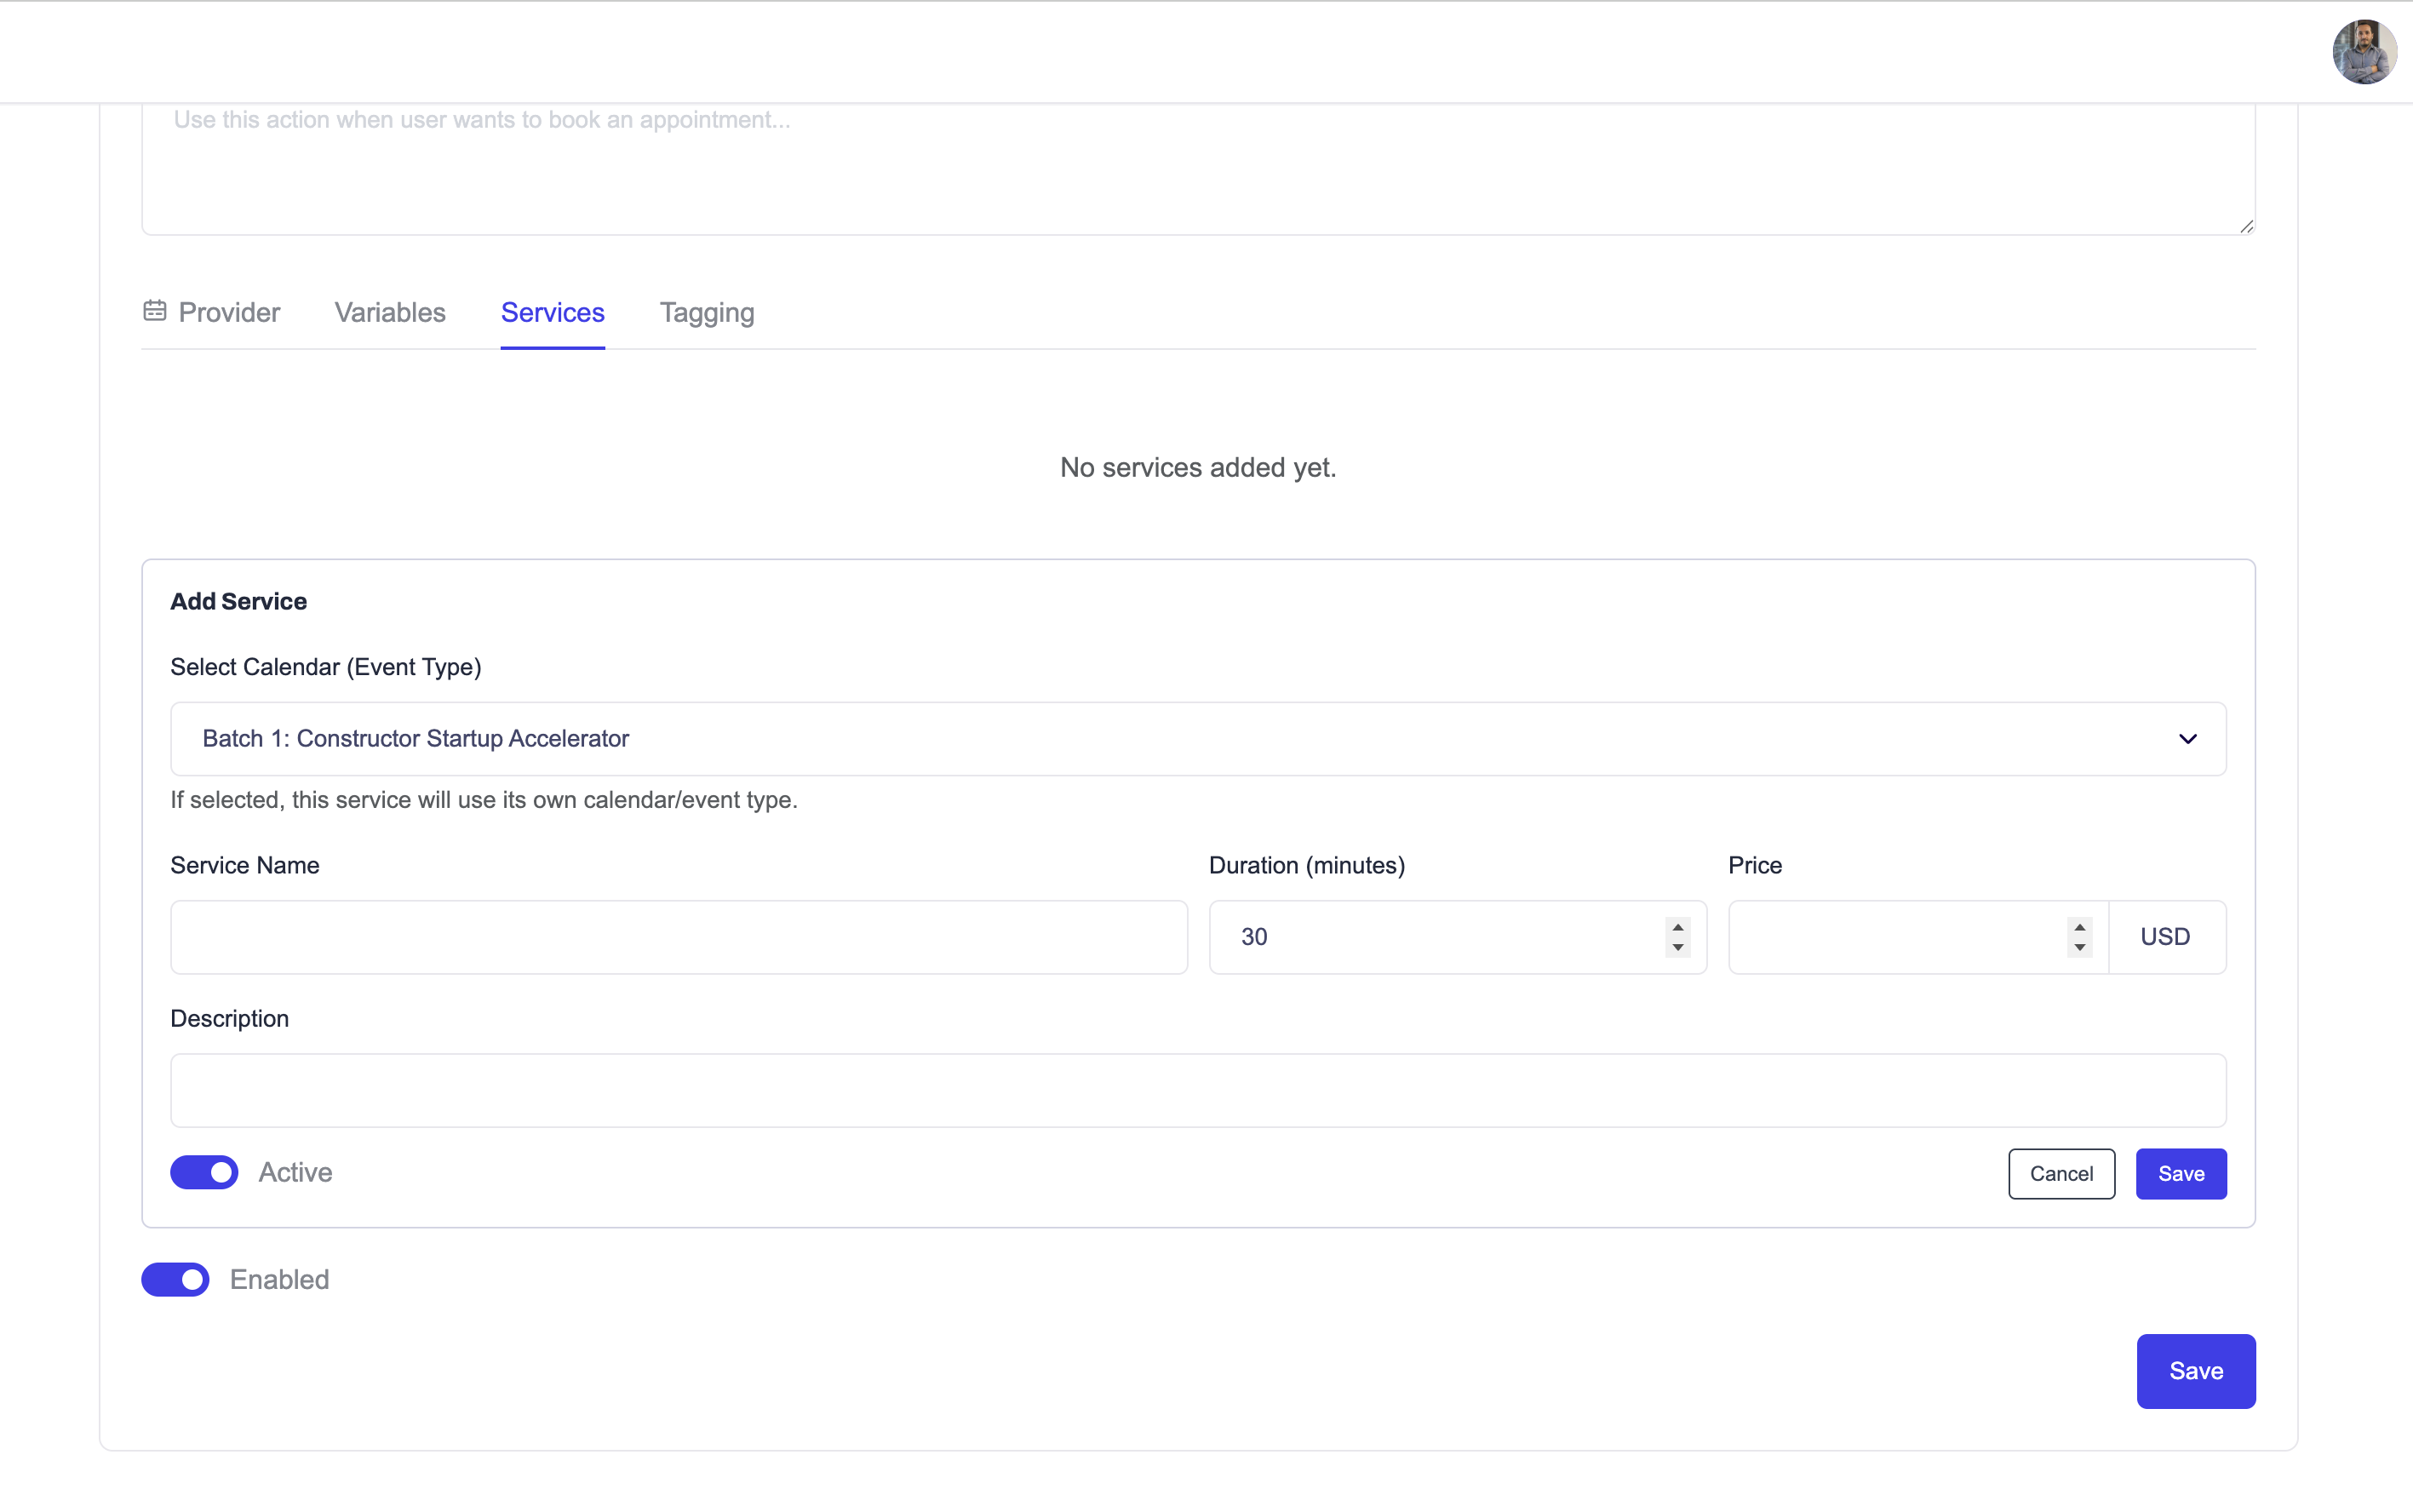
Services allow customers to choose what type of appointment they want to book.
If multiple services are configured, the AI will ask customers which service they need before scheduling the appointment.
Service Configuration
To add a service, click Add Service and configure:
| Field | Description |
|---|---|
| Select Calendar (Event Type) | Optional. The calendar/event type this specific service should be booked into (see calendar priority below) |
| Service Name | Name of the service |
| Duration (minutes) | Appointment duration |
| Price | Service price (with currency, e.g. USD) |
| Description | Additional service information |
| Active | Whether the service can currently be booked |
Click Save to add the service.
Which Calendar a Service Books Into
Each service can be booked into a different calendar. Ainisa resolves the target calendar in this priority order:
- The calendar selected in the service's own Select Calendar (Event Type) field.
- If not selected, the calendar chosen in Select Calendar (Event Type) for this action (Provider tab).
- If that is also not selected, the calendar chosen in the Select Calendar field (Provider tab).
Examples
Dental Clinic
- Teeth Cleaning
- Teeth Whitening
- Implant Consultation
Beauty Salon
- Cosmetics
- Hair Styling
- Facial Treatment
HR Consultant
- CV Creation
- Career Consultation
- Interview Preparation
AI Agency
- Basic Setup
- Business Setup
- Advanced Setup
🏷️ Step 5: Tagging (Premium)
Note: Tagging is available only on paid plans.
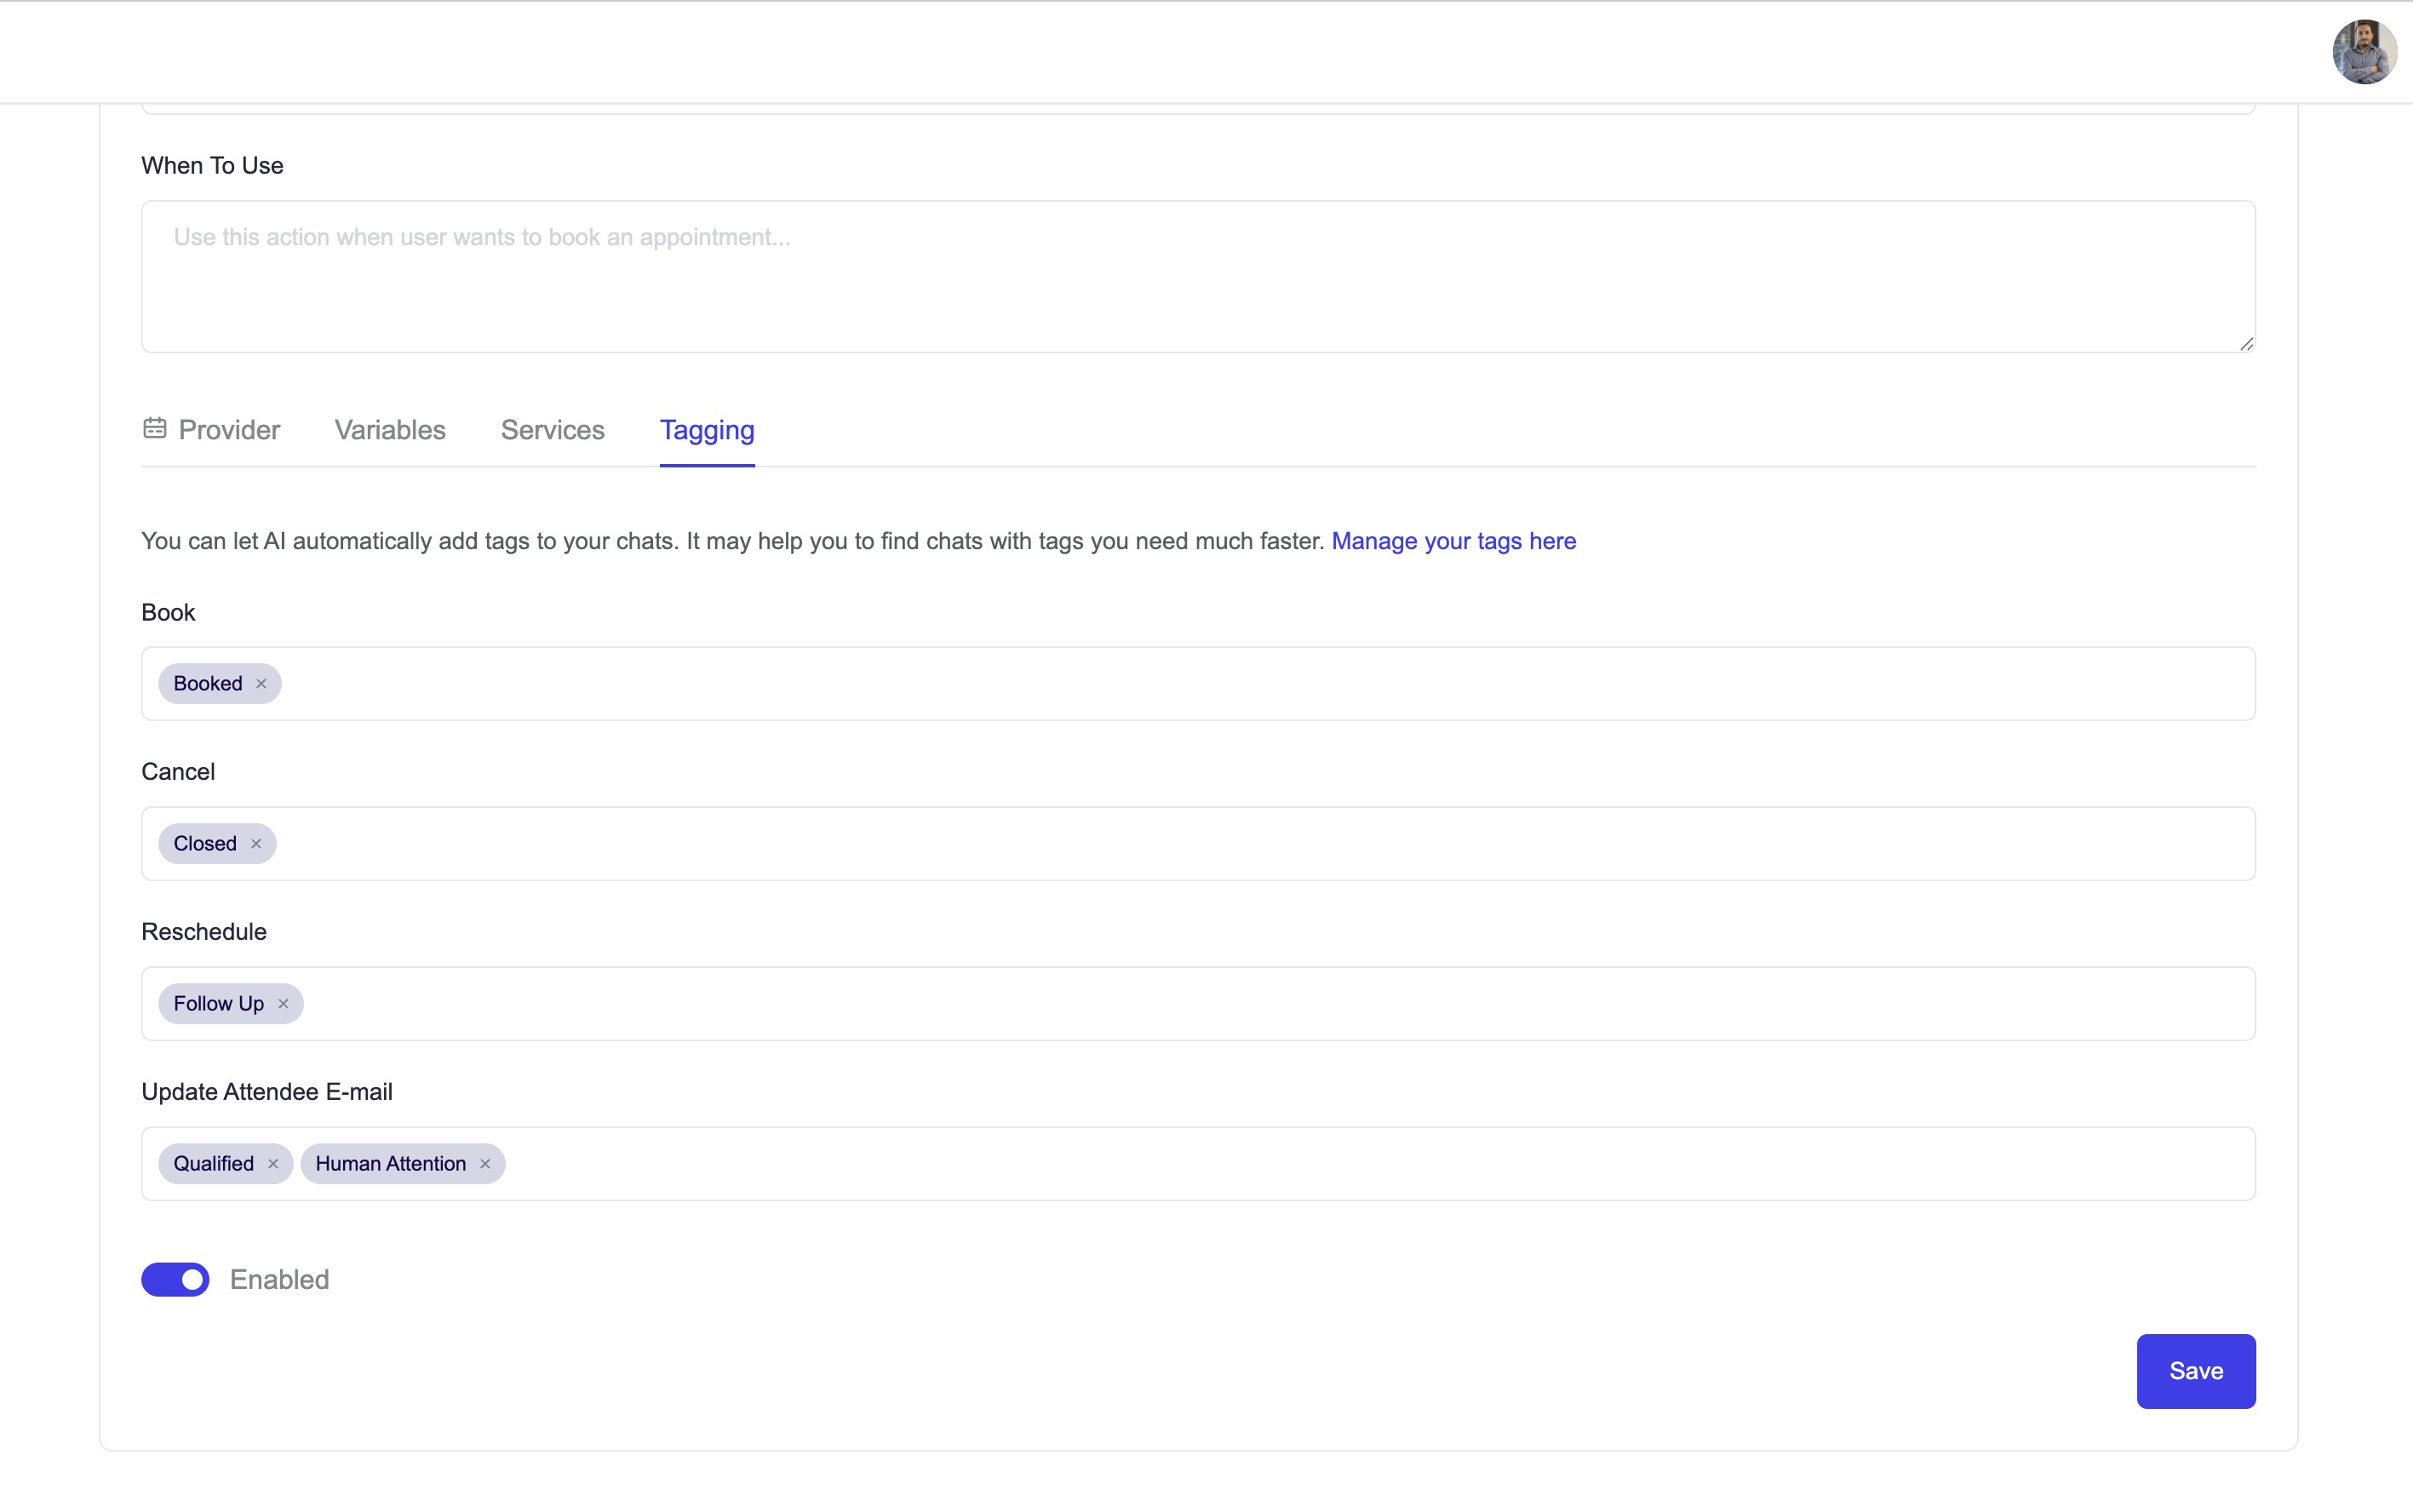
Open the Tagging tab to let the AI automatically add tags to the chats where a booking operation happens. This helps business owners quickly find and filter chats by tag.
Tags are assigned per operation. You can set different tags for:
- Book
- Cancel
- Reschedule
- Update Attendee E-mail
When the AI performs one of these operations, the matching tags are automatically applied to the AI chat.
Important: Tags can only be configured for operations that are enabled in Allowed Operations. If an operation is not selected there, you cannot assign tags for it.
Use Manage your tags here to create and organize your tags.
🔘 Enabled
At the bottom of the action, the Enabled toggle turns the action on or off. When disabled, the AI will not use this booking action.
🤖 How AI Uses Booking Actions
When a customer requests an appointment:
- AI determines that the Booking Action should be used.
- AI asks the customer which service they need (if multiple services exist).
- AI collects required booking information.
- AI checks available appointment slots.
- AI suggests available dates and times.
- Customer selects a slot.
- Ainisa creates the booking in Google Calendar or Calendly.
- The chat is automatically tagged (if Tagging is configured).
- The customer receives booking confirmation.
💡 Example Workflow
Customer:
I want help setting up an AI Agent for my business.
AI:
Great! I can schedule a setup consultation. Which setup package are you interested in?
Customer:
Business Setup.
AI:
Please provide your name, email address, and phone number.
AI then:
- Collects booking information
- Checks available calendar slots
- Offers available times
- Creates the appointment automatically
✅ Notes
- Multiple Booking Actions can be created for a single AI Agent.
- Google Calendar and Calendly are currently supported providers.
- Google Calendar supports availability checking, booking, cancellation, rescheduling, and attendee email updates.
- Calendly requires an active paid Calendly plan.
- guest_name and guest_phone are always required; guest_email is required by default but can be made optional for Google Calendar.
- Each service can target its own calendar; otherwise it falls back to the action-level and then the account-level calendar.
- Services are optional but recommended when offering multiple appointment types.
- Tagging is a paid feature and only supports operations enabled in Allowed Operations.
- Cancel, Reschedule, and Update operations should be described in When To Use to work reliably.